Friday, February 21, 2014

Simple Scripts and Functions in PowerShell

Turning Commands into Scripts

Now we are going to make any commands into scripts for automation.


See into above image. Get-WmiObject command is used to get Total size and Free size of computer.
Here I hardcoded ComputerName and Drive. So see into below image how I use variables to remove hardcode.


Now I am going to add parameters into my script.
We can use param() to make our script parameterize.


Now we are going to make parameterize function into our script. Following image shows the structure of function.
Here the line [CmdletBinding()] is used. This is that next click in formalization. This is where you really transform a function to full cmdlet.


You are done with scripting. Now save your script.
Test your script with PowerShell. Run PowerShell as Administrator. Go to directory where you save your scripts and simply just run script. And try to use function you make it.


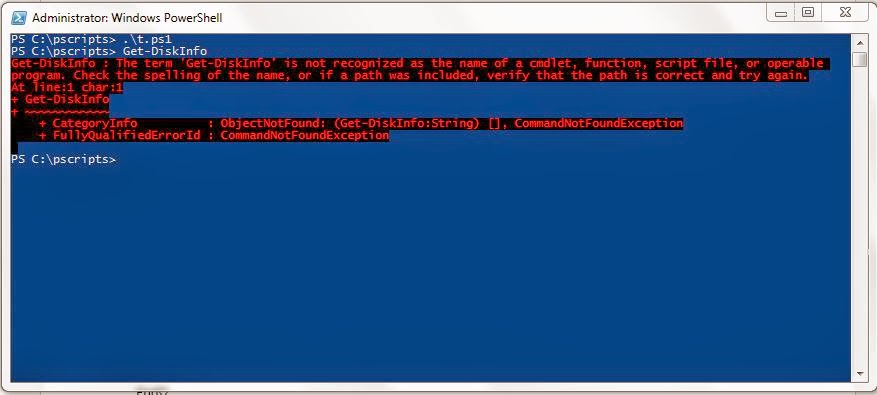
Oops It gives error as you show in picture.
So here what happen when you run your script new line in stack is created and your function is stored into that stack. When script is finished the stack is cleared and your function is cleared.
So what’s next??
The solution for that is make PowerShell not to remove your stack data until you tell to remove or close the Powershell, even-if your script is finished.
To do that as shown in following picture use ‘.’ (dot) before you run the script.


Wednesday, February 19, 2014

Start Scripting with PowerShell

Variables

$ is used in PowerShell to create and use variables.
First time in Programming, you can use space in variable.
You can use latters, numbers, spaces and underscores in variables.
Example:
$MyVar = 7
${My Var} = “Test”
You can also give Variable type like string, integer.
Example:
                [String]$MyName = “Ronak”
                [int]$Test = 6
Now if you give $Test = “test” it will give error. Because $Test is fixed for type [int].
You can use variable as multiple types by using runtime type casting.
Example:
                $x = [int] 6  ß This will store 6 as integer in variable x
Now, $x = “Test” ß This will store string into variable x.
You can use all variable types which are available in .NET.
You can also use following commands:
  • New-Variable
  • Set-Variable
  • Get-Variable
  • Clear-Variable
  • Remove-Variable


Quotation Marks

Pay attention! Single quotes and Double quotes performs differently in PowerShell.
Double Quotes resolves all variables.
Single Quotes prevents substitutions.
Example:
$x = 2
"The Value of $x is $x" ß The Value of 2 is 2
'The Value of $x is $x' ß The Value of $x is $x
"The Value of `$x is $x" ß The Value of $x is 2

Back-trick (` sign available below Esc key) is used to prevent individual substitutions.

Getting started with PowerShell


The Purpose of PowerShell
PowerShell allow you to improve the windows management and helps to improve automation.
PowerShell manages real-time commands with large-scale integration.

How to install PowerShell
PowerShell V3 is comes with Windows Management Framework 3.0
PowerShell V3 is compatible with
  • Windows 8
  • Windows Server 2012
  • Windows 7 SP1
  • Windows Server 2008 R2 SP1
  • Windows Server 2008 SP2

Download Windows Management Framework 3.0
Prerequisite: Full .NET Framework 4.0
Windows XP and Windows Server 2003 can run PowerShell V2
TIP: Always run PowerShell as Administrator.

PowerShell Security Goals
By default PowerShell is secured.
It prevents mistakes by unintentional admins and users.
By clicking on scripts it will not execute scripts, so mistakes can be avoided.
.ps1 extension can be used with notepad or any text editor. You can also use PowerShell ISE. We will talk about this later.
We must have to type full path of file to access or execute file. Shorten paths are restricted to prevent mistakes.

Execution Policy
In PowerShell, there are some execution policies defined for security levels.
By default execution policy is Restricted, which does not execute the script.
Command to know your current execution policy:
        GET-ExecutionPolicy
Command to set execution policy:
        SET-ExecutionPolicy <TYPE>
TYPE can be like
  • Restricted
  • Unrestricted
  • AllSigned
  • Remotesigned
  • Bypass
  • Undefined

Windows PowerShell ISE
The Windows PowerShell Integrated Scripting Environment (ISE) is a host application for Windows PowerShell. In Windows PowerShell ISE, you can run commands and write, test, and debug scripts in a single Windows-based graphic user interface with multiline editing, tab completion, syntax coloring, selective execution, context-sensitive help, and support for right-to-left languages. You can use menu items and keyboard shortcuts to perform many of the same tasks that you would perform in the Windows PowerShell console.  For example, when you debug a script in the Windows PowerShell ISE, to set a line breakpoint in a script, right-click the line of code, and then click Toggle Breakpoint.

Feature of PowerShell ISE
  • Multiline editing: To insert a blank line under the current line in the Command pane, press SHIFT+ENTER.
  • Selective execution: To run part of a script, select the text you want to run, and then click the Run Script button. Or, press F5.
  • Context-sensitive help: Type Invoke-Item, and then press F1. The Help file opens to the Help topic for the Invoke-Item cmdlet.

To start Windows PowerShell ISE
  • Click Start, point to All Programs, point to Windows PowerShell V2, and then click Windows PowerShell ISE.
  • In the Windows PowerShell console Cmd.exe, or in the Run box, type, powershell_ise.exe


Sunday, February 16, 2014

C# - Delegates

What is Delegates?
In a simple language, as we use in C and C++, a pointer which points to the functions. In C# there is no pointer, but delegates are working as a pointer to function.
A delegate is a reference type variable that holds the reference to a method. The reference can be changed at run-time.

Use of Delegates
When we want to use functionality of Events and Call-backs at that time delegates comes to the picture.
Delegates are used to pass methods as arguments to other methods. Event handlers are nothing more than methods that are invoked through delegates. You create a custom method, and a class such as a windows control can call your method when a certain event occurs.

Declaration of Delegates
Declaration of delegates determines the methods that can be referenced by the delegate.
All methods which are refers to delegate must have same signature as delegate.


          delegate   <return type>   <delegate-name>    <parameter list>
public    delegate       int            MyDelegate         (string s);

Example
 

using System;

delegate int Calc(int n);
namespace DelegateAppl
{
   class TestDelegate
   {
      static int num = 0;
      public static int AddNum(int p, int q)
      {
         num = p + q;
         return num;
      }

      public static int MultNum(int p, int q)
      {
         num = p * q;
         return num;
      }
      public static int getNum()
      {
         return num;
      }

      static void Main(string[] args)
      {
         //create delegate instances
         Calc c1 = new Calc(AddNum);
         Calc c2 = new Calc(MultNum);
         //calling the methods using the delegate objects
         c1(25,30);
         Console.WriteLine("Value of Num: {0}", getNum());
         c2(5,6);
         Console.WriteLine("Value of Num: {0}", getNum());
         Console.ReadKey();
      }
   }
}


Output:
Value of Num: 55
Value of Num: 30


Friday, February 14, 2014

Create Simple Web Service in Visual Studio

STEP 1 : Create a simple Web service

When creating a New Project, under the language of your choice, select "Web" and then change to .NET Framework to your choice and you will get the option to create an ASP.NET WEB Service Application.


I am naming my WEB Service as MyWebService.
 
Now you can see the "Service1.asmx.cs" file and also a "[WebMethod] HelloWorld()" in it.

You can add your methods as I show below.


Service1.asmx.cs

using System;
using System.Collections.Generic;
using System.Linq;
using System.Web;
using System.Web.Services;

namespace Myservice
{
    [WebService(Namespace = "http://tempuri.org/")]
    [WebServiceBinding(ConformsTo = WsiProfiles.BasicProfile1_1)]
    [System.ComponentModel.ToolboxItem(false)]
    public class Service1 : System.Web.Services.WebService
    {
        [WebMethod]
        public string HelloWorld()
        {
            return "Hello World";
        }
        [WebMethod]
        public string CheckOddandEvenMethods(int a)
        {
            string results;
            if (a % 2 == 0)
            {
                return results = a + "_" + "Is a Even Number";
            }
            else
            {
                return results = a + "_" + "Is a odd Number";
            }
        }
    }

}

After add WebMethods of your choice, you can run your Service.

STEP 2 : Create Client Program

To create client program select NewProject and select "Console Application" in "Windows" Tab.


I am naming my client "ClientAccess".
Now you need to add a Service Reference so that you can access your web service.
To add service reference:
  1. In Solution Explorer, right-click the name of the project that you want to add the service to, and then click Add Service Reference.
    The Add Service Reference dialog box appears.
  2. Click Discover.
    All services in the current solution are added to the Service list. If not available then manually add them by clicking Advance Tab.
  3. In the Service list, expand the node for the service that you want to use and select a service contract.
  4. In the Namespace box, enter the namespace that you want to use for the reference.
  5. Click OK to add the reference to the project.
  6. A service client (proxy) is generated, and metadata describing the service is added to the app.config file.
After adding service reference write program to use service.


Program.cs

using System;
using System.Collections;
using System.ComponentModel;
using System.Data;
using System.Linq;
using System.Web;
using System.Web.Services;
using System.Web.Services.Protocols;
using System.Xml.Linq;

using ClientAccess.Mytestapp; // Here you need to write namespace Name and its WebReference Name //

namespace ClientAccess
{
    class Program
    {
        static void Main(string[] args)
        {
            // To call Webservice Here
            Service1 Myapp = new Service1();
            string Result = Myapp.CheckOddandEvenMethods(10);
            Console.WriteLine(Result2);
            Console.ReadLine();
        }
    }
} 

Finally Build Project and Run the Project.
Now you can publish your WebApplication in IIS.

For any query regarding this page Comment below.

Freemarket.com Marketplace